Hello, friends! I’m excited to be participating in the STAMPtember® 2024 Blog Party for Simon Says Stamp! Get ready for a month long celebration of stamping and creating. Simon Says Stamp has kicked off the festivities by releasing their own collection of products – you can see the new release here.
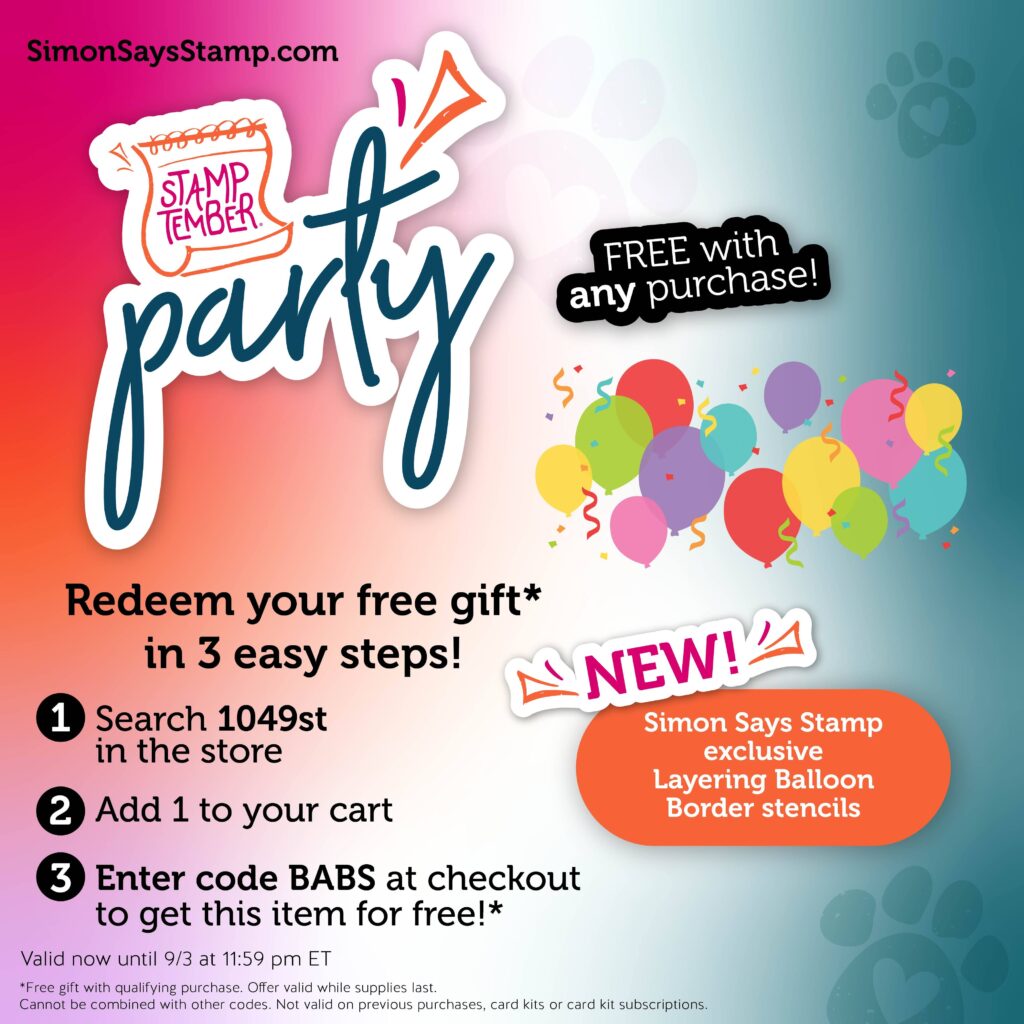
As part of the celebration, Simon is offering several exclusive promotions. See the graphic and promo code above for the Layering Balloon Border stencils FREE with any purchase! To redeem this gift, just add the Layering Balloon Border stencils to your cart, and then add the promo code BABS at checkout. There are other promotions, and you can only use one per order, so figure out which one you want to use by visiting all the designers’ blogs! For a list of all the designers, head over to the Simon Says Stamp blog.
NOTE: all supplies are linked in the thumbnails at the end of this blog post.

Today, I am sharing two cards that feature the new Snowflake Stripes Stencil Set. This set has three stencils, and I used the large snowflake stencil for these cards. At the end of this blog post, you can see the card that I created with the other two stencils, which mask off the snowflake to create the striped pattern. You can also CLICK HERE to see the cards that I have made with other products from the new STAMPtember® collection. For both of these cards, I pulled some favorite older stamps from my stash to join the party!
For my first card, I stenciled the snowflake using Tumbled Glass Distress Ink onto white card stock. I used one of my Picket Fence Pouncers to add the ink through the stencil because of the large opening in the center of the stencil. With the pouncer, I didn’t need to worry about accidentally getting ink underneath part of the stencil. To hold my paper and stencils in place while I was stenciling, I used the new Pawsitively Perfect Craft Tacky Mat.
Once I was finished stenciling the snowflake, I stamped the Not Quite A Dot Cling Stamp over the panel with Peony ink from Pinkfresh Studio. I then stamped the adorable deer from the Deer Delivery Stamp Set onto white card stock and cut it out with a circle die from my stash. I mounted this onto a slightly larger circle that I colored with the Tumbled Glass ink and then glued this to the center of the panel.
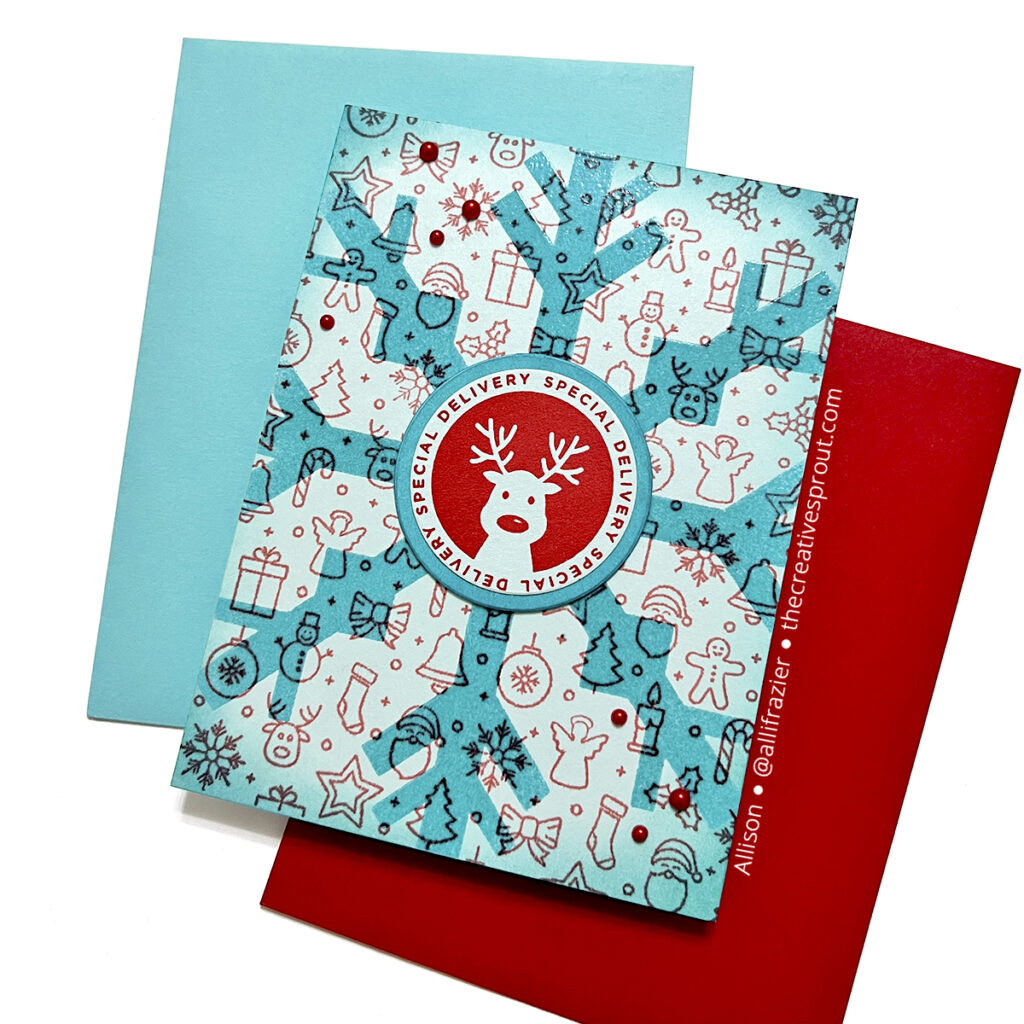
This next card is very similar, except I stamped my cling stamp first. I used the Center Cut Holiday Icons Cling Stamp and the Peony ink to stamp the image onto light blue card stock. I stamped it several times to get a really good impression which made the ink color a little darker, as well. I took the large snowflake stencil and pounced VersaMark ink through it. I then embossed the snowflake with Broken China Distress Embossing Glaze, which makes the snowflake shiny but also allows the stamped pattern to show through. It’s hard to see the shine in the photo, but it’s there! I created the center focal point the same way as the first card, except I stamped the deer onto light blue card stock with Festive Berries Distress Oxide. I added a little bit of shading around the edges of the card with Broken China Distress Ink, and then I finished with a few red pearl embellishments.

This is the card that I made using the other two stencils from the Snowflake Stripes Stencil Set. You can CLICK HERE to see yesterday’s blog post with all the details for this card.
I hope these cards bring a smile to your face today. Be sure to check out all of the inspiration from the other designers who are participating in the Blog Party. Remember that you can find a list on the Simon Says Stamp blog. As always, I appreciate you visiting my blog today.
Wishing you all a crafty day,
Allison
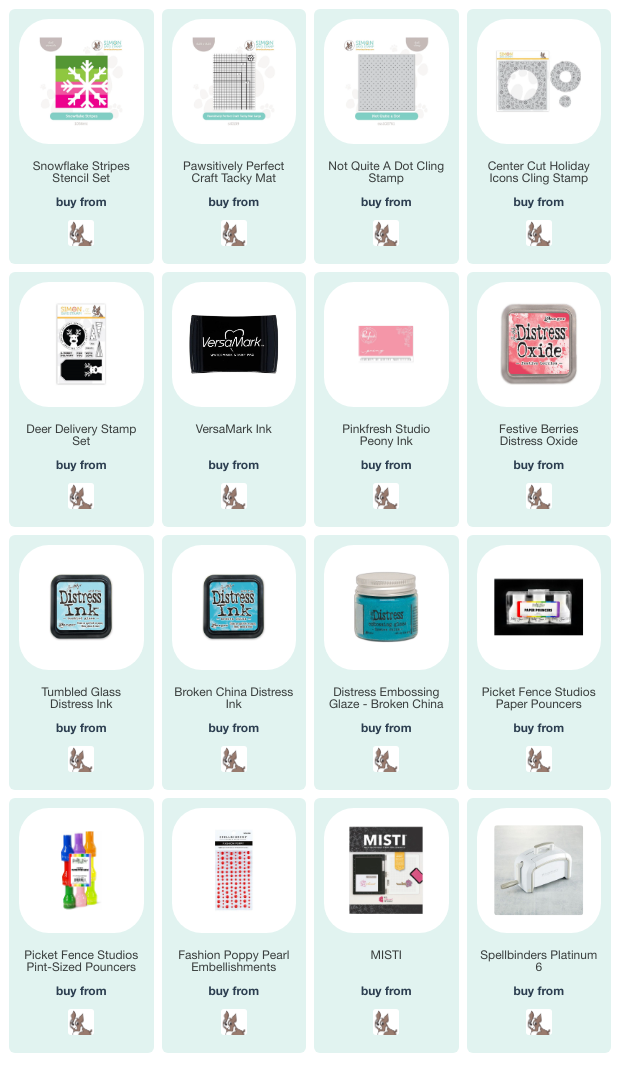
SUPPLY LIST
Note: External links on my blog may contain affiliate links. This gives me the opportunity to earn a small commission when you click on the links and place an order. This comes at no additional cost to you. Thank you so much for your support! You can see more information on my Affiliate Disclosure page.
Beautiful Christmas colors!
Wonderful use of snowflake stencil, visited 3 , 2 codes so far. Onward,
Beautiful! Love that Merry & Bright Snowflake!
Love the backgrounds
Beautiful cards! Love the creative ways of combining products!
Fun cards. I like how you mixed a new item with an older stamp set that I adore. Great job!
Great ideas and so pretty!
The reindeer card is cute but I really like the snowflake card.
Beautiful cards!!
Love these graphic Christmas cards!
beautiful cards!
Fantastic ideas that I’d never seen before! Wonderful!
Adorable deer and I really like the blue/red background. Great job!
Lovely cards!
Love your cards
These are Beautiful and Festive cards!!!!
Two very different cards. Both of them are festive and fun. I love the playful colors of each card. Thanks for sharing.
Love your colors and the simplicity of this card.
Great stenciling techniques!
Your samples are adorable. I love the ones with the deer. So cute.
I love this block snowflake stencil. Thanks for the inspiration!
Wonderful ideas. And stenciling tips
so much inspiration! Thank you….
Love the cards.
Beautiful cards with great instructions.
Love the mix of old and new
Beautiful cards!
Cute cards. I like the pastel one-nice to see some differents ideas for Christmas.
This did in fact bring a smile to my face. Have a wonderful day!
Love the large snowflake!
Beautiful snowflake!!!
Your deer card is so darn cute!
I love both of the color combinations!
Very striking designs, Allison. These are clean yet are full of subtle color and interest with the patterns.
Love your color combinations. Creative!
I love how you used non-traditional colors for your Christmas card. Such a bright color combo!
Great cards. Gonna be a fun blog!
Love this card! Beautiful
Love the big snowflake as your background, nice colors too
That big snowflake is a “star” of the card! LOVE the teal and red color combo.
Such a unique stencil and I love how your cards are all so different!
Love the oversized snowflake and how you used teal!
Awesome cards! Great inspiration
these cards are so beautiful!